


You need: a styrofoam ball
Pins (I used the ones pictured below)
pieces of Scrapbook paper in desired color


A Circle and a flower punchout
Ok... Get ready to punch out a WHOLE bunch of flowers and circles.
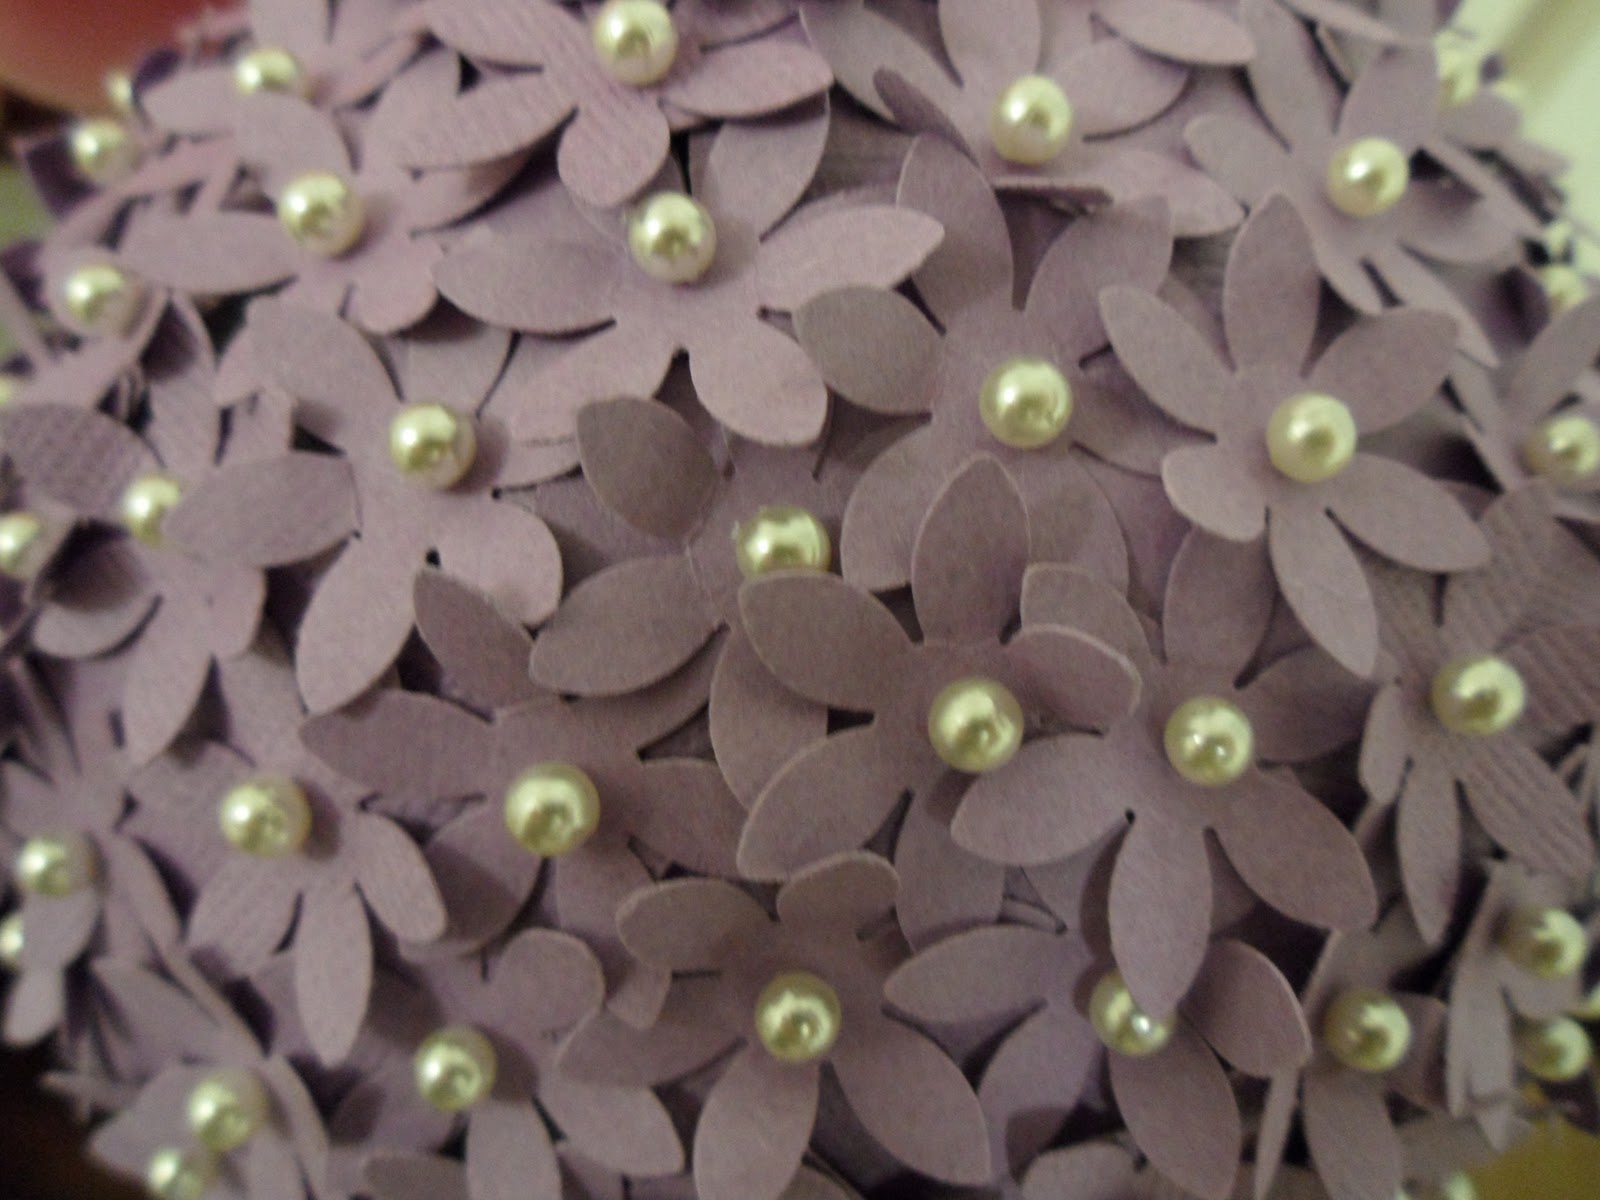
Fold up the petals of the flowers to give dimension

Then take your styrofoam ball and put the circle punchout on first. I started to just add the flowers on without the circle, but you could see too much white styrofoam. I wanted it to look uniform so I added the circle to have purple all over.
Then add the flower on top and poke a pin through. I chose the pearly ones but you could use any I am sure. I put the flowers all around the circle, then added another circle and kept going...

It will look like this

Be patient, watch Disney Channel :) and soon it will turn out like this...!


I added mine on top of a candlestick but I'm sure they would look super cute hanging from the ceiling, or just sitting there. I definitely want to make these in different colors, I love how "springy" they look!
The candlesticks are still my favorite and they are a go to for the decor in my apartment. I found them on Etsy {here}
** WOW! I have received a lot of requests on how to make the pink one. Go HERE to learn how. And please, take a look around!
The candlesticks are still my favorite and they are a go to for the decor in my apartment. I found them on Etsy {here}
** WOW! I have received a lot of requests on how to make the pink one. Go HERE to learn how. And please, take a look around!


32 comments:
Hey thanks for visiting me and following! I'm following you now :) These pomander balls are so cute! Your signature is darling as well! I used to be a nursery leader (in YW now), and nursery was my FAVORITE calling of all time!! :)
This is really a cute idea! So pretty, and so simple! A matching wreath with smaller styrofoam balls would also look great with this!
Love that you put the circle underneath. Great way to hide the styrofoam.
These are gorgeous! I need some punches asap! Too cute! Found you on TT&J
That is so beautiful and elegant. I have been trying to find a cheap flower punch for a while, might have to use my coupon on one. Love the color too.
Oh and I was gonna tell you that there are *TONS* of LDS craft bloggers! Sewdangcutecrafts.com (my SIL), Everycraftyendeavor.com (another SIL), crapivemade.com (friend), tatertotsandjello.blogspot, iammommahearmeroar.blogspot... just to name a few!
That is so cute!!! My daughter has a garden tea party coming up that this might be perfect for! thanks
Oooh, what a great idea! Found you over at the Sunday Showcase Party.
Your ball of pretty purple flowers is so cute! It looks like it would be fun to make too!
So pretty! Perfect decoration for spring!
Really nice! Well done!
love how your's came out, glad I could inspire :) Following you back!
Beautiful project and so simple yet a darling
If you love to play with colours and flowers? Please visit me at
http://craftaworld.blogspot.com/
Love
Farah
This is such a cute idea to add a touch of spring to my decor! Thanks for the good directions on how to make them!
so pretty, love it. winks-jen
This is such a great project! Thanks for sharing.
these look really pretty with the pearl head pins.
megan
craftycpa.blogspot.com
Hey girlie! These are SOOOHOOO Beautiful! I am going to make these 4 sure!
That is so pretty. I just love how delicate it looks. Visiting from Sew Chatty.
-Kimberlee
www.TheSpunkyDiva.com
F-A-B-U-L-O-U-S!!! I might have to try this in my little girls room!!
These are fabulous! I love the pink and purple colors. You did a great job! Thanks for sharing!
Hugs, Rleen
These are so cute - love the color! I will be making my own soon!
BEAUTIFUL!!!I'd love it if you would
link up over at the glitter party! http://runwithglitter.blogspot.com/2011/03/weekly-tues-thurs-link-party.html
Wow - the details make this look amazing. Really cute & spring-y. Would love for you to link it to my Craftastic party:)
Wow! This is truly amazing!!! You have such patience! But it turned out so lovely!
I host a Friday link party I would love you to come join if you are interested.
Ashley
www.simplydesigning.blogspot.com
I love this. I am doing something similar for my son's daycare teachers. I am using a stryofoam egg, painting it, and attaching small silk flower with the small scrapbooking brads. At the top I attached a ribbon to the top.
Thanks for coming and linking up to my link party! Love your creativity.
Shauna
http://myshaenoel.blogspot.com/
Wow! Just gorgeous! It IS like a breath of spring!
Do you have a post about how to make the pink one also shown in the picture??? So cute!
These are absolutely adorable and I need to make some myself, I'm hosting my first link party and would love for you to stop on by and link up if you can. www.mysimplehomelife.com
Love these! How did you do the wavy pink one?!?!
Love these! How you make the wavy pink one?!?!
Post a Comment